茫茫網海中的冷日
         
茫茫網海中的冷日
發生過的事,不可能遺忘,只是想不起來而已!
 恭喜您是本站第 1670905 位訪客!  登入  | 註冊
主選單

Google 自訂搜尋

Goole 廣告

隨機相片
IMG_0041.jpg

授權條款

使用者登入
使用者名稱:

密碼:


忘了密碼?

現在就註冊!

微軟帝國 : [轉貼]PowerShell - Read an Excel file using COM Interface

發表者 討論內容
冷日
(冷日)
Webmaster
  • 註冊日: 2008/2/19
  • 來自:
  • 發表數: 15771
[轉貼]PowerShell - Read an Excel file using COM Interface

PowerShell - Read an Excel file using COM Interface

Last week, I worked on a small PowerShell script to read a custom excel file sheet with a lot of information in different columns and rows. Unfortunately, you'll have to adapt the script to your needs. However I thought this might be helpful to understand how this work.

Here is the sample Excel file I worked with:


COM interface: Excel.Application

Layers
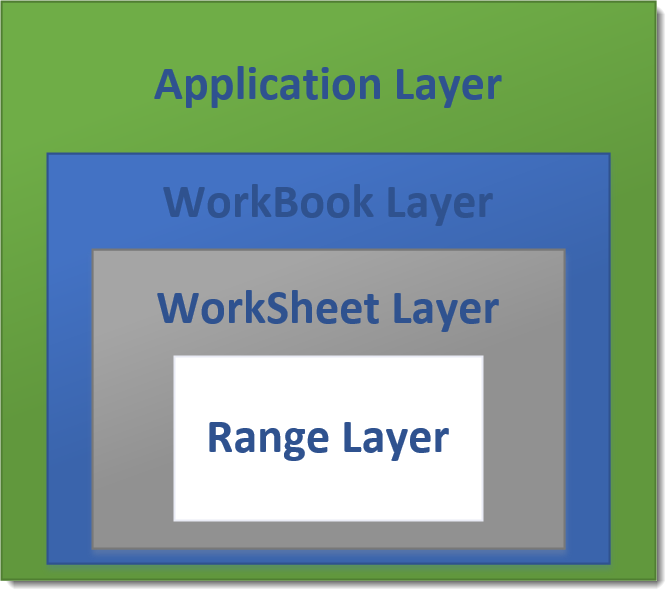
To access an Excel file data, you have to be aware of the hierarchy of each elements/layers.
The first element will be the application class (at the the top) that contains one or more workbooks, each workbooks contains one or more worksheets, inside each of the worksheet you can access ranges. Each element can access down to some of the other layers.


Microsoft Excel - Layers


Application layer
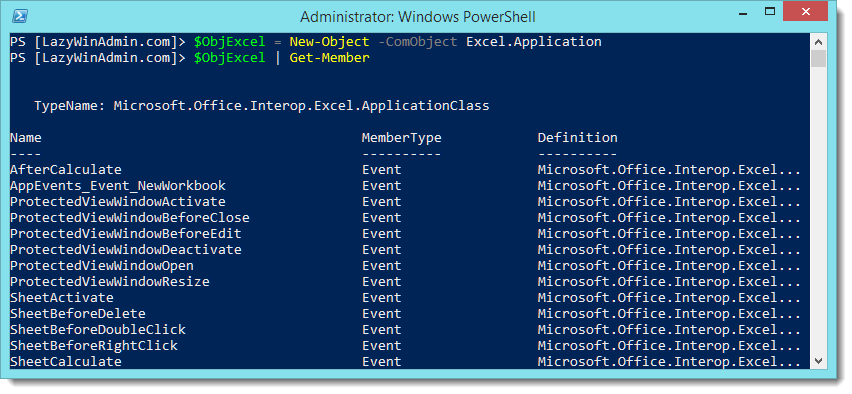
This will open a new instance of excel on my computer as you can see below:
$objExcel = New-Object -ComObject Excel.Application

MSDN reference: 
Microsoft.Office.Interop.Excel.ApplicationClass


A new Excel Instance is created


Workbook layer
In the second step, we are opening the workbook inside the Excel Instance.
$WorkBook = $objExcel.Workbooks.Open("C:\VIDEOSERVER01-BuildSpecs.xlsx")


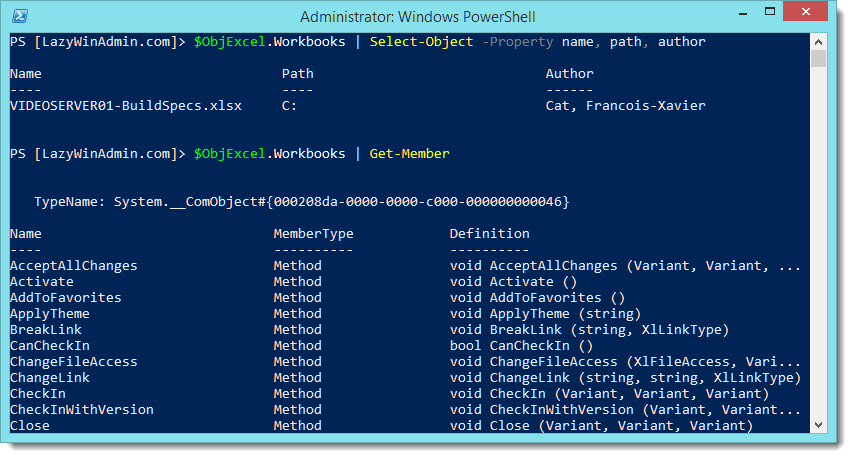
We can verify that the workbook is opened using the following line
$objExcel.WorkBooks | Select-Object -Property name, path, author


Then see the properties and methods that can be used
$objExcel.WorkBooks | Get-Member


In the following example, I hold the data inside the $WorkBook variable.
$WorkBook = $objExcel .Workbooks.Open( "C:\VIDEOSERVER01-BuildSpecs.xlsx" )


I then look for any member (property, method, or event) that contains the word "sheet".
$WorkBook | Get-Member -Name *sheet*


My WorkBook contains 2 worksheets as you can see in the first image of the article, "BuildSpecs" and "Sheet2", PowerShell can retrieve this information using the "sheets" property.
$WorkBook.sheets | Select-Object -Property Name


WorkSheet layer
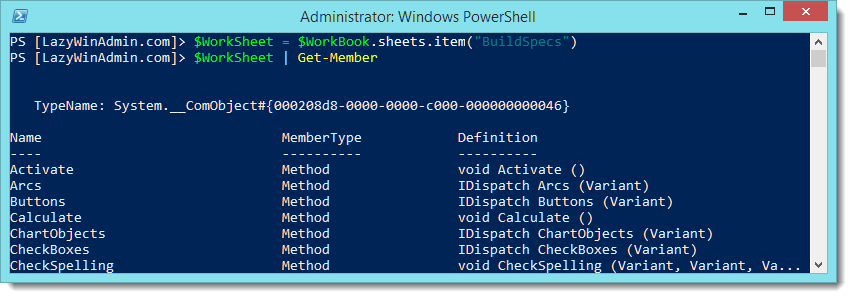
We select the sheet BuildSpecs and are now able to start working on the data
$WorkSheet = $WorkBook.sheets.item("BuildSpecs")


Loading and getting the Data

Loading the file in PowerShell can be done with just a few lines.


# Specify the path to the Excel file and the WorkSheet Name
$FilePath = "C:\VIDEOSERVER01-BuildSpecs.xlsx"
$SheetName = "BuildSpecs"
# Create an Object Excel.Application using Com interface
$objExcel = New-Object -ComObject Excel.Application
# Disable the 'visible' property so the document won't open in excel
$objExcel.Visible = $false
# Open the Excel file and save it in $WorkBook
$WorkBook = $objExcel.Workbooks.Open($FilePath)
# Load the WorkSheet 'BuildSpecs'
$WorkSheet = $WorkBook.sheets.item($SheetName)


Let's get the ComputerName value which is "VIDEOSERVER01" is this example.
If you look at the sheet "BuildSpecs" below, you'll see the ComputerName information in the C3 cell. We can also refer to it using the coordinate-systems: Third column/third row.


Different methods are possible to retrieve the information from the sheet, I found the following ones:


$worksheet.Range("C3").Text
$worksheet.Range("C3:C3").Text
$worksheet.Range("C3","C3").Text
$worksheet.cells.Item(3, 3).text
$worksheet.cells.Item(3, 3).value2
$worksheet.Columns.Item(3).Rows.Item(3).Text
$worksheet.Rows.Item(3).Columns.Item(3).Text
$worksheet.UsedRange.Range("c3").Text


Finally we can create a PowerShell object to output the information we want to extract from the Excel file.


$Output = [pscustomobject][ordered]@{
ComputerName
= $WorkSheet.Range("C3").Text
Project
= $WorkSheet.Range("C4").Text
Ticket
= $WorkSheet.Range("C5").Text
Role
= $WorkSheet.Range("C8").Text
RoleType
= $WorkSheet.Range("C9").Text
Environment
= $WorkSheet.Range("C10").Text
Manufacturer
= $WorkSheet.Range("C12").Text
SiteCode
= $WorkSheet.Range("C15").Text
isDMZ
= $WorkSheet.Range("C16").Text
OperatingSystem
= $WorkSheet.Range("C18").Text
ServicePack
= $WorkSheet.Range("C19").Text
OSKey
= $WorkSheet.Range("C20").Text
Owner
= $WorkSheet.Range("C22").Text
MaintenanceWindow
= $WorkSheet.Range("C23").Text
NbOfProcessor
= $WorkSheet.Range("C26").Text
NbOfCores
= $WorkSheet.Range("C27").Text
MemoryGB
= $WorkSheet.Range("C29").Text
}


Script example


Here is an example with all the pieces together.


#Specify the path of the excel file
$FilePath = "C:\LazyWinAdmin\VIDEOSERVER01-BuildSpecs.xlsx"
#Specify the Sheet name
$SheetName = "BuildSpecs"
# Create an Object Excel.Application using Com interface
$objExcel = New-Object -ComObject Excel.Application
# Disable the 'visible' property so the document won't open in excel
$objExcel.Visible = $false
# Open the Excel file and save it in $WorkBook
$WorkBook = $objExcel.Workbooks.Open($FilePath)
# Load the WorkSheet 'BuildSpecs'
$WorkSheet = $WorkBook.sheets.item($SheetName)
[
pscustomobject][ordered]@{
ComputerName
= $WorkSheet.Range("C3").Text
Project
= $WorkSheet.Range("C4").Text
Ticket
= $WorkSheet.Range("C5").Text
Role
= $WorkSheet.Range("C8").Text
RoleType
= $WorkSheet.Range("C9").Text
Environment
= $WorkSheet.Range("C10").Text
Manufacturer
= $WorkSheet.Range("C12").Text
SiteCode
= $WorkSheet.Range("C15").Text
isDMZ
= $WorkSheet.Range("C16").Text
OperatingSystem
= $WorkSheet.Range("C18").Text
ServicePack
= $WorkSheet.Range("C19").Text
OSKey
= $WorkSheet.Range("C20").Text
Owner
= $WorkSheet.Range("C22").Text
MaintenanceWindow
= $WorkSheet.Range("C23").Text
NbOfProcessor
= $WorkSheet.Range("C26").Text
NbOfCores
= $WorkSheet.Range("C27").Text
MemoryGB
= $WorkSheet.Range("C29").Text
}

Download


GitHub
Technet Gallery

Other References


Thanks for reading! If you have any questions, leave a comment or send me an email at fxcat@lazywinadmin.com. I invite you to follow me on Twitter @lazywinadm / Google+ / LinkedIn. You can also follow the LazyWinAdmin Blog on Facebook Page and Google+ Page.

原文出處: LazyWinAdmin: PowerShell - Read an Excel file using COM Interface
冷日
(冷日)
Webmaster
  • 註冊日: 2008/2/19
  • 來自:
  • 發表數: 15771
[轉貼]Read Excel sheet in Powershell
Read Excel sheet in Powershell

The below script reads the sheet names of an Excel document....
How could I improve it so it could extract all the contents of column B (starting from row 5 - so row 1-4 are ignored) in each worksheet and create an object?
E.g. if column B in worksheet 1 (called London) has the following values:
Marleybone
Paddington
Victoria
Hammersmith

and column C in worksheet 2 (called) Nottingham has the following values:
Alverton
Annesley
Arnold
Askham

I'd want to create a object that from that looks like this:
City,Area
London,Marleybone
London,Paddington
London,Victoria
London,Hammersmith
Nottingham,Alverton
Nottingham,Annesley
Nottingham,Arnold
Nottingham,Askham

This is my code so far:
clear all

sheetname = @()

    $excel=new-object -com excel.application
    $wb=$excel.workbooks.open("c:\users\administrator\my_test.xls")
    for ($i=1; $i -le $wb.sheets.count; $i++)
    {
      $sheetname+=$wb.Sheets.Item($i).Name;
    }

$sheetname


This assumes that the content is in column B on each sheet (since it's not clear how you determine the column on each sheet.) and the last row of that column is also the last row of the sheet.
$xlCellTypeLastCell = 11
$startRow,$col=5,2

$excel=new-object -com excel.application
$wb=$excel.workbooks.open("c:\users\administrator\my_test.xls")

for ($i=1; $i -le $wb.sheets.count; $i++){
    $sh=$wb.Sheets.Item($i)
    $endRow=$sh.UsedRange.SpecialCells($xlCellTypeLastCell).Row
    $city=$sh.Cells.Item($startRow,$col).Value2
    $rangeAddress=$sh.Cells.Item($startRow+1,$col).Address() + ":" +$sh.Cells.Item($endRow,$col).Address()
    $sh.Range($rangeAddress).Value2 | foreach {
        New-Object PSObject -Property @{City=$city;Area=$_}
    }
}


冷日說明:
這個看起來值得學習,回覆者雖然用預定義[coee]
$xlCellTypeLastCell = 11
$startRow,$col=5,2[/code]
來解決提問者的問題。
但事實上,只要能知道 Row、Col,或是取得 RowMax 以及 ColMax 的話,就可以用 for 迴圈下去做!
$WorkSheet = $WorkBook.sheets.item($SheetName)
$objRange = $WorkSheet.UsedRange
$RowMax = $objRange.Rows.Count
$ColMax = $objRange.Columns.Count

剩下的控制冷日就不多說啦,看你要撈哪個欄位囉...


原文出處:Read Excel sheet in Powershell - Stack Overflow/
冷日
(冷日)
Webmaster
  • 註冊日: 2008/2/19
  • 來自:
  • 發表數: 15771
[轉貼]How Can I Read from Excel Without Using Excel?

Hey, Scripting Guy! How Can I Read from Excel Without Using Excel?

ScriptingGuy1
12 Sep 2008 3:23 AM
Hey, Scripting Guy! Question

Hey, Scripting Guy! I have an Microsoft Office Excel spreadsheet with server names in it, and I would like to be able to use this in a Windows PowerShell script. The thing is, I do not have Microsoft Office or Excel installed on the server. How can I use this spread sheet without installing Office on my server (which I understand is unsupported anyway)?

- FE

Spacer
Hey, Scripting Guy! Answer

Hi FE,


So you want to be able to use Excel, but you do not want to install Excel? Sounds like one of those riddles I heard when I was a kid. You know those things like, "If you take a red crayon and color all the pages in the book so that no one can see any of the writing, is it a red book?" (Or is it a read book? Homophones can be so confusing. Especially triple homophones such as: so, sew, sow. This is cool: I just figured out that Microsoft Word seems to hate homophones, it is underlining all kinds of stuff with squiggly lines write now. 
One guy on the Web has collected 441 of the things; one nicety about such a collection is that it does not occupy as much space as a book collection or a car collection.)

Often when working with Excel from within a scripting language, we tend to use the  Excel Automation Model. Using the Excel Automation Model generally involves creating an instance of the 
Excel.Application object. This would look something like the script seen here:


$objExcel=New-Object -ComObject Excel.Application
$objExcel.Visible=$false
$WorkBook=$objExcel.Workbooks.Open($strPath)
$worksheet = $workbook.sheets.item("ServerList")
$intRowMax = ($worksheet.UsedRange.Rows).count
$Columnnumber = 1
for($intRow = 2 ; $intRow -le $intRowMax ; $intRow++)
{
$name = $worksheet.cells.item($intRow,$ColumnNumber).value2
"Querying $name ..."
Get-WmiObject -Class win32_bios -computername $name
}
$objexcel.quit()

But, FE, you specifically stated you did not want to use the Excel object model to query the spread sheet. You are then left with using Active X Data Objects (ADO). There are two flavors of ADO: the classic COM ADO you may have used in VBScript, and ADO.NET. In general, the ADO.NET flavor is faster and provides more options. With both the COM version of ADO and ADO.NET you will need to specify a provider. In some cases, these provider names will be the same. In other cases, you will find providers for a specific flavor of ADO.


In the script we create two objects. The first is the System.Data.OleDb.OleDbConnection object and the second is theSystem.Data.OleDb.OleDbCommand object. You will note that both of the objects are in the System.Data.OleDb namespace. Only the last portion of each name actually changes. These correspond to the connection and the command object we used in classic COM ADO. After the two objects are created, we associate the connection with the command object, open the connection, and use theExecuteReader method from the command object. We then use the data reader to work our way through the data that is returned. We select the name column, pass it to WMI, and close both data reader and connection. The script is shown here:


$strSheetName = 'ServerList$'
$strProvider = "Provider=Microsoft.Jet.OLEDB.4.0"
$strDataSource = "Data Source = $strFileName"
$strExtend = "Extended Properties=Excel 8.0"
$strQuery = "Select * from [$strSheetName]"
$objConn = New-Object System.Data.OleDb.OleDbConnection("$strProvider;$strDataSource;$strExtend")
$sqlCommand = New-Object System.Data.OleDb.OleDbCommand($strQuery)
$sqlCommand.Connection = $objConn
$objConn.open()
$DataReader = $sqlCommand.ExecuteReader()
While($DataReader.read())
{
$ComputerName = $DataReader[0].Tostring()
"Querying $computerName ..."
Get-WmiObject -Class Win32_Bios -computername $ComputerName
}
$dataReader.close()
$objConn.close()

Let's look at the script in a bit more detail. We begin the script by initializing a bunch of variables. The first is the path to the Excel spread sheet. (Note: We do not test to ensure this path actually exists. We left it out to reduce the complexity of the script. In a real script you would certainly want to verify the presence of the file before attempting to read the file. To do this in PowerShell you would use the  Test-Path cmdlet.) We then specify the sheet name. As seen in this figure, I always like to rename the Excel spreadsheets (I also delete the two extra sheets that I never seem to use as well):


Excel spreadsheet graphic


Next we need to specify the provider name, data source, and extended parameters for our connection. These are exactly the same as you would have used in classic COM ADO. Last, we need to specify our query. This takes the form of "Select * from [sheetname]". Note that the spreadsheet name must go inside square brackets (square brackets, not square pants). This section of the script is shown here:


$strSheetName = 'ServerList$'
$strProvider = "Provider=Microsoft.Jet.OLEDB.4.0"
$strDataSource = "Data Source = $strFileName"
$strExtend = "Extended Properties=Excel 8.0"
$strQuery = "Select * from [$strSheetName]"

The next thing we need to do is to create the two objects we will be using. When we create the OleDbConnection object we specify the provider, data source, and the extended parameters to the New-Object command. These values are called the constructor as it is used in constructing the connection object. Next we need to create the command object. The OleDbCommand object accepts the query for its constructor. After we have these two objects created, we need to wire up the connection and the command, open the connection, and use the ExecuteReader method from the OleDbCommand object to return our information. This section of the code is shown here:


 )
$sqlCommand = New-Object System.Data.OleDb.OleDbCommand($strQuery)
$sqlCommand.Connection = $objConn
$objConn.open()
$DataReader = $sqlCommand.ExecuteReader()

The object that comes back from the ExecuteReader method is called a DataReader. To work with a DataReader, we need to use theRead method. We use the While statement that says as long as the DataReader is returning data, we will keep on reading. This line of code is shown here:

While($DataReader.read())

Well, what are we going to do while we have data coming from the DataReader? We are going to take the first piece of data and turn it into a string. This will be our computer name from the spreadsheet. We then use it in a basic WMI query. To do the WMI query, we use the Get-WmiObject cmdlet and give it the WMI class to query (Win32_Bios) and the name of the computer to query (the one from the spreadsheet). This is seen here:


$ComputerName = $DataReader[0].Tostring()
"Querying $computerName ..."
Get-WmiObject -Class Win32_Bios -computername $ComputerName

To be polite, we close out the DataReader, and we close our connection to the Excel spreadsheet. This is easy to do; we use the closemethod as shown here:


$dataReader.close()
$objConn.close()

The results from this script are impressive because of the minimalistic approach to data return. With our background, we are trying to exhaust the blues whilst understating the induction of white (for all you art majors). This can clearly be seen in this figure:

Query Excel results graphic


See, FE, that was not too bad was it? This is just half of the equation. If we happen to have an Excel spreadsheet handy, we can use this method to query it. However, if you do not have one handy, we will need to write to the spreadsheet and populate it with data. We will do that next week. Until then, TTFN.

Ed Wilson and Craig Liebendorfer, Scripting Guys


原文出處:
Hey, Scripting Guy! How Can I Read from Excel Without Using Excel? - Hey, Scripting Guy! Blog - Site Home - TechNet Blogs
冷日
(冷日)
Webmaster
  • 註冊日: 2008/2/19
  • 來自:
  • 發表數: 15771
[轉貼]Get the Number of Rows in Column of a worksheet
Get the Number of Rows in Column of a worksheet

I have an Excel sheet as follows:
Id   Name   Address
-------------------
1    t1     Add1
2           Add2
3

I want to get the count of non-empty cells in each column, i.e.:
    Column ID → 3 rows
    Name → 1 row
    Address → 2 rows

How do I do this in power shell? I tried various things but they don't seem to work.

I am new to PowerShell. Is there a way to get the number of rows for a column directly?
$SheetName = "Sheet1"
$Excel = New-Object -ComObject "Excel.Application"

$Workbook = $Excel.workbooks.open($XLSDoc)
$Sheet = $Workbook.Worksheets.Item($SheetName)
$objRange = $Sheet.UsedRange
$RowCount = $objRange.Rows.Count
$ColumnCount = $objRange.Columns.Count
Write-Host "RowCount:" $RowCount
Write-Host "ColumnCount" $ColumnCount
$Range1 = $Sheet.Range("A1:A5")
$TestCount = $Range1.Rows.Count
Write-Host $TestCount


Try something like this:
$xl = New-Object -COM "Excel.Application"
$xl.Visible = $true

$wb = $xl.Workbooks.Open("C:\path\to\your.xlsx")
$ws = $wb.Sheets.Item(1)

$rows = $ws.UsedRange.Rows.Count

foreach ( $col in "A", "B", "C" ) {
  $xl.WorksheetFunction.CountIf($ws.Range($col + "1:" + $col + $rows), "<>") - 1
}

$wb.Close()
$xl.Quit()


原文出處:powershell - Get the Number of Rows in Column of a worksheet - Stack Overflow
前一個主題 | 下一個主題 | 頁首 | | |


Powered by XOOPS 2.0 © 2001-2008 The XOOPS Project|