
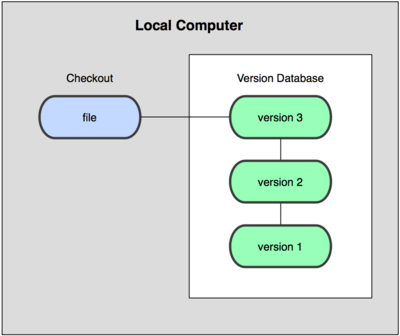
這半年算正式接觸 git 的使用,開始從 svn 轉過去了吧?! :P 接著則架設公司用的 Git Server 服務,就挑選了 Gitolite 套件,以打造像 github.com 服務,並透過 htpasswd 管理,提供簡易的 GitWeb 版,讓公司成員可以透過 Web 進行下載、瀏覽程式碼,而開發成員可以同時且分散式地開發程式。
在這邊就不多說 Git 的使用,而著重在 Gitolite 跟 GitWeb 的部份,其中 Gitolite 則是透過綁定一個系統帳號,而眾人存取都是透過 SSH Key-pair 來進行,只要把 keys 命名及綁定權限,就可以決定哪隻 key 可以讀寫、哪隻 key 只能讀取,達成簡易的權限管理。
Gitolite 的安裝及設定(採用 gitolite 系統帳號):
$ sudo apt-get install gitolite
$ sudo adduser gitolite
$ sudo su gitolite
$ whoami
gitolite
建立管理者(綁在一個 key):
$ cd /path
$ ssh-keygen -t rsa -P '' -f gitolite
$ ls
gitolite gitolite.pub
初次設定 Gitolite:
$ whoami
gitolite
$ gl-setup /path/gitolite.pub
The default settings in the rc file (/home/gitolite/.gitolite.rc) are fine for most
people but if you wish to make any changes, you can do so now.
hit enter...
creating gitolite-admin...
Initialized empty Git repository in /home/gitolite/repositories/gitolite-admin.git/
creating testing...
Initialized empty Git repository in /home/gitolite/repositories/testing.git/
[master (root-commit) #######] start
2 files changed, 6 insertions(+)
create mode 100644 conf/gitolite.conf
create mode 100644 keydir/gitolite.pub
新增使用者帳號(請對方產生Key-pair後,把 public key 交給你,此例是 alice.pub):
$ git clone gitolite@localhost:gitolite-admin.git
(需使用當初登記為管理者的 key 來存取)
$ cd gitolite-admin
$ ls
conf keydir
$ cp /path/alice.pub keydir
$ git add keydir/alice.pub
$ git commit -m 'add users: alice'
$ git push
如此一來,該使用者 (alice.pub) 就能夠透過 git clone gitolite@localhost:testing.git 進行存取測試,且新增使用者可遠端進行
新增專案(proj.git) & 設定權限(alice):
$ cd ~/ && ls
projects.list repositories
$ ls ~/repositories
gitolite-admin.git testing.git
$ git clone gitolite@localhost:gitolite-admin.git
(需使用當初登記為管理者的 key 來存取)
$ cd gitolite-admin
$ vim conf/gitolite.conf
repo gitolite-admin
RW+ = gitolite
repo testing
RW+ = @all
repo proj
RW+ = alice
R = @all
$ git commit -a -m 'add projects: proj.git'
$ git push
...
...
remote: creating proj...
remote: Initialized empty Git repository in /home/gitolite/repositories/proj.git/
$ ls ~/repositories
gitolite-admin.git proj.git testing.git
如此一來,Alice 就可以拿著自己的 key 用 git clone gitolite@localhost:proj.git 取出來讀寫了,並提供其他人讀取的權限,且新增專案、設定權限皆可遠端進行
架設 Gitweb:
$ sudo apt-get install apache2 gitweb
$ sudo usermod -a -G gitolite www-data
$ sudo vim /etc/gitweb.conf
$projectroot = "/home/gitolite/repositories";
$feature{'highlight'}{'default'} = [1];
# 提供系統 loadavg check,若系統繁忙,逛 gitweb 只會看到 503 - The load average on the server is too high 訊息
$maxload = 500;
設定 repo 建立權限為 0750,如此一來 www-data 才可以存取:
$ vim /home/gitolite/.gitolite.rc
REPO_UMASK = 0027;
接著設定 htpasswd 來管理 gitweb 的使用:
$ sudo htpasswd -cb /etc/appach2/gitweb.htpasswd ID PASSWD
$ sudo vim /etc/apache2/conf.d/gitweb
Alias /gitweb /usr/share/gitweb
<Directory /usr/share/gitweb>
Options FollowSymLinks +ExecCGI
AddHandler cgi-script .cgi
AuthUserFile /etc/apache2/gitweb.htpasswd
AuthName "GitWeb"
AuthType Basic
require valid-user
Order allow,deny
Allow from 127.0.0.0/255.0.0.0 10.0.0.0/8 192.168.0.0/16 ::1/128
satisfy any
</Directory>
如此一來,公司內部(10.0.0.0/8, 192.168.0.0/16) 可以直接逛 gitweb,而外部連線進來則需要 id/passwd 的確認才能瀏覽。如果不想要把某些 project 被 gitweb 讀取的話,就把它 chmod 700 吧 ($ chmod 700 /home/gitolite/repositories/gitolite-admin.git )
@ 2012-09-06 補充:
Ubuntu 12.04 內建的 Gitolite 版本為 2.2-1,尚不支援 Admin Defined Commands (ADC) ?! 故先從
https://github.com/sitaramc/gitolite 取下後來安裝 Gitolite 3.x ,粗略升級流程:
- 移除系統 Gitolite
- $ sudo apt-get remove gitolite
- 備份舊版 Gitolite & admin key-pair
- $ sudo cp -r /home/gitolite /home/gitolite-2.2-1
$ sudo chown -R gitolite:gitolite /home/gitolite-2.2-1
$ mv /home/gitolite-2.2-1/repositories/gitolite-admin.git /home/gitolite-2.2-1/gitolite-admin.git
$ mv /home/gitolite-2.2-1/repositories/testing.git /home/gitolite-2.2-1/testing.git
- 下載和安裝最新版 Gitolite (在此換掉原先的 gitolite.pub)
- $ whoami
gitolite
$ rm -rf ~/* ~/.gitolite* ~/.ssh
$ cd ~/
$ git clone https://github.com/sitaramc/gitolite.git
$ mkdir ~/.ssh ~/bin
$ ssh-keygen -t rsa -P '' -f ~/.ssh/gitolite
$ ls ~/.ssh
gitolite gitolite.pub
$ mv ~/.ssh/gitolite ~/.ssh/id_rsa
$ gitolite/install -to $HOME/bin
$ ~/bin/gitolite setup -pk ~/ssh/gitolite.pub
...
$ ls ~/
bin gitolite projects.list repositories
- 設定 Gitolite.rc 與 Gitweb 的部份
- $ vim ~/.gitolite.rc
UMASK => 0027, # = 0750
- 恢復原先 repositories 跟 keys
- $ cp -r /home/gitolite-2.2-1/repositories/* ~/repositories/
$ cd ~/
$ git clone /home/gitolite-2.2-1/gitolite-admin.git old-gitolite-admin
$ git clone gitolite@localhost:gitolite-admin.git
$ rm ~/old-gitolite-admin/keydir/gitolite.pub
$ cp ~/old-gitolite-admin/keydir/* ~/gitolite-admin/keydir/
$ cp ~/old-gitolite-admin/conf/gitolite.conf ~/gitolite-admin/conf/gitolite.conf
$ cd ~/gitolite-admin
$ git add .
$ git commit -a -m 'restore init'
$ git push
測試 ADC(需設定 ~/.gitolite.rc 的 COMMANDS 清單,預設只有幾項 commands 可以用):
$ ssh gitolite@localhost help
hello gitolite, this is gitolite3 v3.04-15-gaec8c71 on git 1.7.9.5
list of remote commands available:
D
desc
help
info
perms
writable
遠端指定 repo myproj 進行刪除:
$ ssh gitolite@git-server D unlock myproj
$ ssh gitolite@git-server D rm myproj
遠端建立 repo myproj 方式,有兩種方式:
- 編輯 gitolite-admin/conf/gitolite.conf,直接新增未存在的 repo 後,git push 後則會自動建立
- 在 gitolite-admin/conf/gitolite.conf 給定 C 權限,如此一來,在 git clone 不存在的專案則會自動建立
- $ vim gitolite-admin/conf/gitolite.conf
@admin = user1 user2 user3
repo [a-zA-Z0-9].*
C = @admin
RW+D = CREATOR
R = @all
- $ git clone gitolite@git-server:myproject.git
...
若 myproject.git 不存在,則會自動建立 myproject.git,並且建立者有 D 的權限,可以透過 ssh gitolite@git-server D rm myproj 來刪除
此外,公司常將一些內部使用的服務擺在防火牆後透,並透過 port forwarding 來處理對外連線,這時候需指定 port 連線,常用的有 ssh, git 跟 scp 指令,用法如下:
$ git clone ssh://gitolite@git-server:port/myproject.git
$ ssh -p port gitolite@git-server help
$ scp -r -P port input user@git-server:output
@ 2012-09-07 搭配使用者自動管理專案之 ADC 常用方式:
編輯 gitolite-admin/conf/gitolite.conf ,提供使用者自動建立 public projects 和 private projects 功能:
repo priv/CREATOR/[a-zA-Z0-9].*
C = @RDs
RW+D = CREATOR
RW = WRITERS
R = READERS
# Update bin/Gitolite/Rc.m Or add into ~/.gitolte.rc :
# $REPOPATT_PATT = qr(^\@?[[0-9a-zA-Z \(^][-0-9a-zA-Z._\@/+\\^$|()[\]*?
!={},]*$);
repo ^(?!priv/)[0-9a-zA-Z]+$
C = @RDs
RW+D = CREATOR
RW = WRITERS
R = @all
當使用者直接用 $ git clone gitolite@git-server:myproj.git 時,若 myproj.git 不存在則自動建立,此屬性屬於第二個,也就是對全體帳號預設都可以 Read 的;如果是用 $ git gitolite@git-server:priv/UserID/myprivate.git 時,這時 myprivate.git 預設是只有建立者可以讀取跟寫入。此外,這些專案的創立者也可以砍掉專案。
至於要對專案開放權限,則可以使用 perms 指令:
增加讀寫權限:
$ ssh gitolite@git-server perms myproject + WRITERS coworker_name
增加讀取權限:
$ ssh gitolite@git-server perms myproject + READERS coworker_name
移除讀寫(讀取)權限:
$ ssh gitolite@git-server perms myproject - WRITERS coworker_name
$ ssh gitolite@git-server perms myproject - READERS coworker_name
列出權限清單:
$ ssh gitolite@git-server perms -l myproject
刪除專案:
$ ssh gitolite@git-server D unlock myproject
$ ssh gitolite@git-server D rm myproject
移到垃圾桶和還原操作:
$ ssh gitolite@git-server trash myproject
'myproject' moved to trashcan
$ ssh gitolite@git-server list-trash
myproject/2012-09-07_21:45:25
$ ssh gitolite@git-server restore myproject/2012-09-07_21:45:25
'myproject/2012-09-07_21:45:25' restored to 'myproject'


-2014-08-13-18-52-24.png)
-2014-08-13-18-52-29.png)
