茫茫網海中的冷日
         
茫茫網海中的冷日
發生過的事,不可能遺忘,只是想不起來而已!
 恭喜您是本站第 1664714 位訪客!  登入  | 註冊
主選單

Google 自訂搜尋

Goole 廣告

隨機相片
PIMG_00189.jpg

授權條款

使用者登入
使用者名稱:

密碼:


忘了密碼?

現在就註冊!

小企鵝開談 : [轉貼]Using Text mode to install CentOS 6.2

發表者 討論內容
冷日
(冷日)
Webmaster
  • 註冊日: 2008/2/19
  • 來自:
  • 發表數: 15766
[轉貼]Using Text mode to install CentOS 6.2
2012-03-02 14:11 Using Text mode to install CentOS 6.2

Step1. Press [Tab]


Step2. Input "text" after the line "vmlinuz initrd=initrd.img" And press [Enter] to boot.


原文出處: Using Text mode to install CentOS 6.2 @ 資訊維誌 :: 隨意窩 Xuite日誌
冷日
(冷日)
Webmaster
  • 註冊日: 2008/2/19
  • 來自:
  • 發表數: 15766
[轉貼]CentOS 6 最小化安裝找不到setup工具方法
CentOS 6 最小化安裝找不到setup工具方法
2012-06-26 分類:LINUX、LINUX技巧 43 views

-
晚上沒事的時候在安裝CentOS 6時由於安裝時不想安裝圖形界面,所以選擇了最小化安裝,安裝後,連最基本的setup命令都找不到,因為沒有安裝 setuptool的原因,解決辦法:yum install setuptool來解決,可實際上這樣根本解決不了問題,原因很簡單:最小化安裝時網卡都沒有給你配置,你上網都上不了根本沒辦法採用這個方法;真正的 解決方法其實也很簡單:通過cdrom安裝盤來安裝軟件!

一、掛載CDROM
# mkdir /media/cdrom
# mount /dev/cdrom /media/cdrom

二、安裝setuptool
# yum -–disablerepo=\* –-enablerepo=c6-media install setuptool ntsysv system-config-firewall-tui system-config-network-tui system-config-keyboard、system-config-language、system-config-printer

三、說明:
1)上述命令中–disablerepo=\*參數是為了屏蔽系統缺省的yum庫;
2)上述命令中–enablerepo=c6-media是為了起用cdrom安裝盤為yum庫,如果是CentOS 5,名稱就要用c5-media(不是c6-media)
3)我們通常把光驅都是掛載在/mnt/cdrom這個位置的,可為什麼這裡要掛載在/media/cdrom這個地方呢?
大家通過命令 cat /etc/yum.repos.d/CentOS-Media.repo就可以看到如下的內容:
# CentOS-Media.repo
#
# This repo is used to mount the default locations for a CDROM / DVD on
# CentOS-6. You can use this repo and yum to install items directly off the
# DVD ISO that we release.
#
# To use this repo, put in your DVD and use it with the other repos too:
# yum –enablerepo=c6-media [command]
#
# or for ONLY the media repo, do this:
# yum –disablerepo=\* –enablerepo=c6-media [command]
#
[c6-media]
name=CentOS-$releasever – Media
baseurl=file:///media/CentOS/
file:///media/cdrom/
file:///media/cdrecorder/
gpgcheck=1
enabled=0
gpgkey=file:///etc/pki/rpm-gpg/RPM-GPG-KEY-CentOS-6

上述說明清楚地表明yum的baseurl所指向的位置是/media/下的三個目錄,用哪個目錄名隨你了,我用的是cdrom。:)

ntsysv 軟件包是用來通過setup工具進行「服務」項的控制,一次可以多選幾個服務項;
system-config-firewall-tui軟件包是用來通過setup進行防火牆配置的;
system-config-network-tui軟件包是用來通過setup進行網卡配置的;
注意後兩個包名稱都是以-tui結尾的,tui是 text user interface(文本用戶接口),網上有些介紹的方法是安裝圖形用戶接口。
同樣的方法還可以安裝system-config-keyboard、system-config-language、system-config-printer等等,反正我是暫時不需要的。


原文出處:CentOS 6 最小化安装找不到setup工具方法 – 浩浩电脑知识网-操作系统应用技巧及电脑知识的专业博客
冷日
(冷日)
Webmaster
  • 註冊日: 2008/2/19
  • 來自:
  • 發表數: 15766
[分享]CentOS 6.2 驅動 Hyper-V網路介面卡

CentOS 6.2 驅動 Hyper-V網路介面卡

在hyper-v 上安裝CentOS 6.2 (我是使用最小安裝),如果網路卡,不是使用傳統網路介面卡

在安裝完畢後是沒有網路可以用的,但是因為[傳統網路介面卡]效能不好

所以建議還是使用[網路介面卡]效能較佳


驅動網路步驟

1.先下載整合性服務 v3.2版本

http://www.microsoft.com/download/en/details.aspx?id=28188

  • 將Linux IC v3.2.iso掛載。
  • mount /dev/cdrom /media/cdrom
  • cd /media/cdrom;sh instsll.sh
  • 建立/etc/sysconfig/network-scripts/ifcfg-eth0設定檔
  • modprobe e1000 (載入驅動程式)

PS :在hyper-v 裡面可以使用e1000 網卡驅動程式來驅動網卡

網卡設定檔內容如下:

DEVICE=eth0
BOOTPROTO=static  (dhcp)
ONBOOT=yes
NETMASK=255.255.255.0
IPADDR= 1.1.1.1
GATEWAY=1.1.1.1
TYPE=Ethernet
USERCTL=no
IPV6INIT=no
PEERDNS=yes

啟動網卡: ifup eth0

以上步驟完成就可以使用網路了

附註:

通常我們會使用 service network start | stop | restart  來啟動關閉重啟動 網路卡

但是我好不容易可以上網後,重開機又要重新下一次 ifup etho 才可以啟動網卡

且service network start 指令下了以後竟然沒反應 !!!

所以建議如果你(妳)是使用最小安裝模式, 建議網卡啟動以後

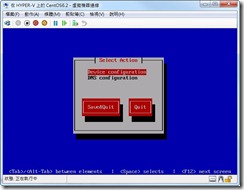
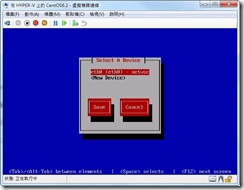
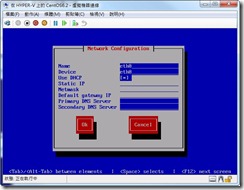
利用yum 安裝網路設定的圖形工具


yum install system-config-network-tui

安裝完畢後直行 [system-config-network]

跑一次如下圖的網路設定,跑完後 service network 指令就可以使用

重開機也可以將網路服務自動啟動

centosnet1


centosnet2

centosnet3


原文出處: CentOS 6.2 驅動 Hyper-V網路介面卡 | MIS的背影


冷日補充:
1.執行 modprobe e1000 後,記得重開機

2.一般會用 text mode 安裝或是最小化安裝,大多都是熟悉 Console 的用戶,絕大多數是為了節省效能給 Service 用的吧!?
所以大多數都是 Statioc IP 吧!?使用 DHCP 得機會很小低,所以冷日順便提供一下冷日的 ifcfg-eth0 給各位參考參考:

# cat /etc/sysconfig/network-scripts/ifcfg-eth0
DEVICE=eth0
IPADDR=10.16.68.43
NETMASK=255.255.255.0
GATEWAY=10.16.68.254
ONBOOT=yes
PEERDNS=no
BOOTPROTO=none
TYPE=Ethernet
IPV6INIT=no
USERCTL=no
冷日
(冷日)
Webmaster
  • 註冊日: 2008/2/19
  • 來自:
  • 發表數: 15766
[分享]冷日習慣會把 SELinux 關閉
記得要把 SELinux 關閉

有兩種方法, 一種是在開機設定檔 /etc/grub.conf 中, 把selinux=0加到傳遞給kernel的命令列.
ex:
...
title Fedora Core (2.6.x-xxx)
root (hd0,7)
kernel /boot/vmlinuz-2.6.x-xxx ro selinux=0 root=LABEL=/
initrd /boot/initrd-2.6.x-xxx.img
...


或者直接修改SELinux設定檔 /etc/sysconfig/selinux, 把SELINUX這個參數設成disabled, 再重新開機
就可以了.
ex:
# This file controls the state of SELinux on the system.
# SELINUX= can take one of these three values:
# enforcing - SELinux security policy is enforced.
# permissive - SELinux prints warnings instead of enforcing.
# disabled - No SELinux policy is loaded.
SELINUX=disabled
# SELINUXTYPE= type of policy in use. Possible values are:
# targeted - Only targeted network daemons are protected.
# strict - Full SELinux protection.
SELINUXTYPE=targeted
冷日
(冷日)
Webmaster
  • 註冊日: 2008/2/19
  • 來自:
  • 發表數: 15766
[分享]CentOS 6.5 最小記憶體需求

2.1. Hardware Requirements

Red Hat recommends minimum of 200 MB of disk space for a typical installation. Large test lab environments can require 2 GB to support the complete deployment, including product binaries, databases, and log files. Very large directories may require 4 GB and above.

Red Hat suggests 256 MB of RAM for average environments and 1 GB of RAM for large test lab environments for increased performance.


Number of Entries Disk Space/Required Memory
10,000 - 250,000 entries
Free disk space: 2 GB
Free memory: 256 MB
250,000 - 1,000,000 entries
Free disk space: 4 GB
Free memory: 512 MB
1,000,000 + entries
Free disk space: 8 GB
Free memory: 1 GB
Table 2.1. Hardware Requirements


冷日安裝某次 CentOS6.5 時,一開始使用 128MB 記憶體,安裝過程根本無法進行!
後來使用 256MB 會被告之記憶體不夠,無法安裝!
直到最後使用 512MB 才可以順利安裝!
冷日只能說 CentOS 也越來越不 Linux 了!
註:冷日是用 text mode 最小安裝!

Table 轉載於 2.1. Hardware Requirements
冷日
(冷日)
Webmaster
  • 註冊日: 2008/2/19
  • 來自:
  • 發表數: 15766
[轉貼]RHEL7/CentOS7 — Text Installation

RHEL7/CentOS7 — Text Installation

Before start work on Linux/Unix, we should of various installation type and ways for some of famous distribution available in market.


In this post we will see how we could install various Linux distributions. Actually Installing Linux/Unix system is quite simple as compared to any other OS like Windows where you need to care about license and various Edition of Windows server and their features before installing, you should aware of things required for you application and need to care at time of installation. But in case of Linux required things could be full-filled after installation, with very easy steps.

It always carry quite less space in comparison of Windows OS. A normal Windows7 machine take minimum 20GB of Disk at installation and continually increase because of update, in couple of years it easily consume more than 100GB of disk. But in case Linux it hardly take 8-10 GB of disk space with all required OS features and with continues update it won’t take much space, hardly 2-3 GB of disk space.


Let’s take an example, you like to host one website with complete hold of development and OS part. For same you need one virtual private Server. In case you use windows machine, it highly resource consumable as compared of Linux. So you should always use Linux/Unix system in case you like to have complete hold, better resource utilization, secure infrastructure.

One thing I recommend that you should have some idea of Disk partition and utilization for OS when you like to install Linux. In this post we would see how we could Install various distribution of Linux/Unix.

Linux could install in Text and graphical mode.We can make installation from remote Server like in Windows it called RIS (Remote Installation Service).Let’s start with text installation.

Linux CentOS7 Text installation


CentOS and RHEL OS has same features and commands as per Administrative point of view. CentOS is freely available for use and practice. We could begin CentOS installation with its DVD available on centos-website. Previous version could be download from vault

For installation, we need to boot machine from CentOS DVD. We need to write “text install” till CentOS6. From CentOS7 text installation could start in bit different way.

Let’s see HowTo install centOS7 in Text mode. This mode is quit easy to load, fast and good for installation with terminal phase on KVM Guest machine.


After Boot Machine with CentOS7 DVD, its ask to begin installation like below image.

We have to select installation tab and press tab. This way we can see complete options used for installation and over it we need to write text and press enter. Descriptions is provided below with images. We also have one video for same which is attached with post in last.

Now This would come up with screen contain various options that need to fill before we go for the further installation process.

Now we have to start working on Timezone Setting. As we can see its has tab number (1). Same we have 7 tabs which could used to set Operating system settings.


As we set Time zone, we have to perform for other configuration and need to set them as well as per our requirement.

Now we need to select disk, for same we need select 4.it will further ask for partitions or default layout etc.
After complete my OS setting, it will see see like below.

 
Now OS installation start and it will ask for reboot in end. We have one video in which we performed these steps in detail.


原文出處:RHEL7/CentOS7 -- Text Installation

冷日補充:
除了 tab 鍵這個方案外,冷日採用的是 ' Press e to edit command' 然後在 cmd 最後面加上 "text" 後開始安裝


前一個主題 | 下一個主題 | 頁首 | | |


Powered by XOOPS 2.0 © 2001-2008 The XOOPS Project|