

對這文章發表回應
發表限制: 非會員 可以發表
發表者: 冷日 發表時間: 2015/12/18 2:36:50
PowerShell - Read an Excel file using COM Interface
 Last week, I worked on a small PowerShell script to read a custom excel file sheet with a lot of information in different columns and rows. Unfortunately, you'll have to adapt the script to your needs. However I thought this might be helpful to understand how this work.
Here is the sample Excel file I worked with:

COM interface: Excel.Application
LayersTo access an Excel file data, you have to be aware of the hierarchy of each elements/layers.
The first element will be the application class (at the the top) that contains one or more workbooks, each workbooks contains one or more worksheets, inside each of the worksheet you can access ranges. Each element can access down to some of the other layers.
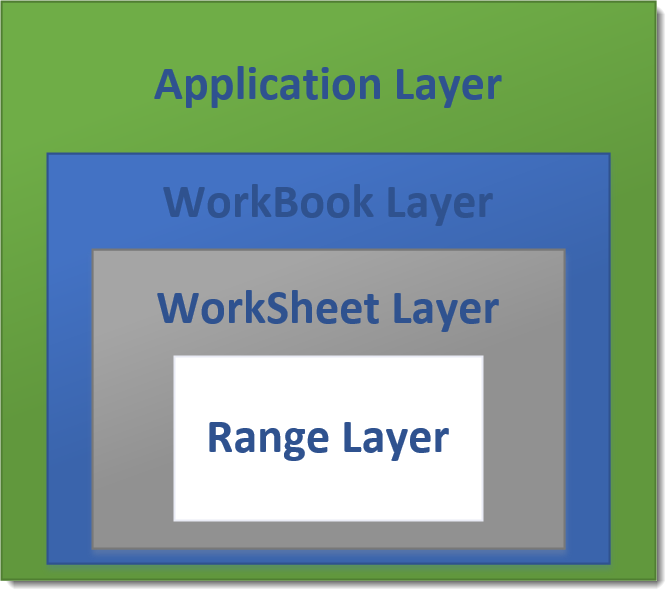 |
| Microsoft Excel - Layers |
Application layer
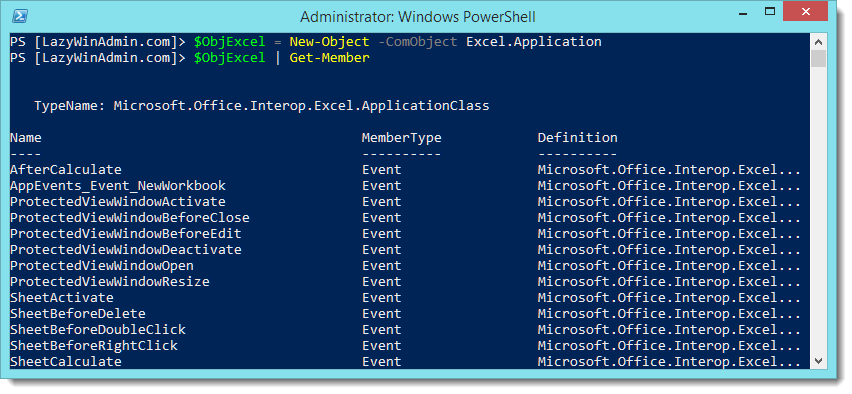
This will open a new instance of excel on my computer as you can see below:
$objExcel = New-Object -ComObject Excel.Application
MSDN reference:
Microsoft.Office.Interop.Excel.ApplicationClass
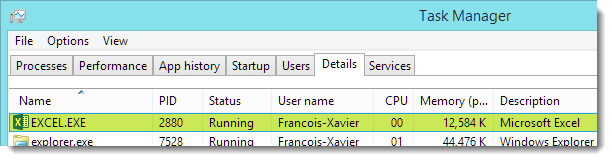 |
| A new Excel Instance is created |
Workbook layer
In the second step, we are opening the workbook inside the Excel Instance.
$WorkBook = $objExcel.Workbooks.Open("C:\VIDEOSERVER01-BuildSpecs.xlsx")

We can verify that the workbook is opened using the following line
$objExcel.WorkBooks | Select-Object -Property name, path, author
Then see the properties and methods that can be used
$objExcel.WorkBooks | Get-Member

In the following example, I hold the data inside the $WorkBook variable.
$WorkBook = $objExcel .Workbooks.Open( "C:\VIDEOSERVER01-BuildSpecs.xlsx" )
I then look for any member (property, method, or event) that contains the word "sheet".
$WorkBook | Get-Member -Name *sheet*

My WorkBook contains 2 worksheets as you can see in the first image of the article, "BuildSpecs" and "Sheet2", PowerShell can retrieve this information using the "sheets" property.
$WorkBook.sheets | Select-Object -Property Name

WorkSheet layer
We select the sheet BuildSpecs and are now able to start working on the data
$WorkSheet = $WorkBook.sheets.item("BuildSpecs")

Loading and getting the Data
Loading the file in PowerShell can be done with just a few lines.# Specify the path to the Excel file and the WorkSheet Name
$FilePath = "C:\VIDEOSERVER01-BuildSpecs.xlsx"
$SheetName = "BuildSpecs"
# Create an Object Excel.Application using Com interface
$objExcel = New-Object -ComObject Excel.Application
# Disable the 'visible' property so the document won't open in excel
$objExcel.Visible = $false
# Open the Excel file and save it in $WorkBook
$WorkBook = $objExcel.Workbooks.Open($FilePath)
# Load the WorkSheet 'BuildSpecs'
$WorkSheet = $WorkBook.sheets.item($SheetName)
Let's get the ComputerName value which is "VIDEOSERVER01" is this example.
If you look at the sheet "BuildSpecs" below, you'll see the ComputerName information in the C3 cell. We can also refer to it using the coordinate-systems: Third column/third row.

Different methods are possible to retrieve the information from the sheet, I found the following ones:
$worksheet.Range("C3").Text
$worksheet.Range("C3:C3").Text
$worksheet.Range("C3","C3").Text
$worksheet.cells.Item(3, 3).text
$worksheet.cells.Item(3, 3).value2
$worksheet.Columns.Item(3).Rows.Item(3).Text
$worksheet.Rows.Item(3).Columns.Item(3).Text
$worksheet.UsedRange.Range("c3").Text
Finally we can create a PowerShell object to output the information we want to extract from the Excel file.
$Output = [pscustomobject][ordered]@{
    ComputerName = $WorkSheet.Range("C3").Text
    Project = $WorkSheet.Range("C4").Text
    Ticket = $WorkSheet.Range("C5").Text
    Role = $WorkSheet.Range("C8").Text
    RoleType = $WorkSheet.Range("C9").Text
    Environment = $WorkSheet.Range("C10").Text
    Manufacturer = $WorkSheet.Range("C12").Text
    SiteCode = $WorkSheet.Range("C15").Text
    isDMZ = $WorkSheet.Range("C16").Text
    OperatingSystem = $WorkSheet.Range("C18").Text
    ServicePack = $WorkSheet.Range("C19").Text
    OSKey = $WorkSheet.Range("C20").Text
    Owner = $WorkSheet.Range("C22").Text
    MaintenanceWindow = $WorkSheet.Range("C23").Text
    NbOfProcessor = $WorkSheet.Range("C26").Text
    NbOfCores = $WorkSheet.Range("C27").Text
    MemoryGB = $WorkSheet.Range("C29").Text
}

Script example
Here is an example with all the pieces together.
#Specify the path of the excel file
$FilePath = "C:\LazyWinAdmin\VIDEOSERVER01-BuildSpecs.xlsx"
#Specify the Sheet name
$SheetName = "BuildSpecs"
# Create an Object Excel.Application using Com interface
$objExcel = New-Object -ComObject Excel.Application
# Disable the 'visible' property so the document won't open in excel
$objExcel.Visible = $false
# Open the Excel file and save it in $WorkBook
$WorkBook = $objExcel.Workbooks.Open($FilePath)
# Load the WorkSheet 'BuildSpecs'
$WorkSheet = $WorkBook.sheets.item($SheetName)
[pscustomobject][ordered]@{
    ComputerName = $WorkSheet.Range("C3").Text
    Project = $WorkSheet.Range("C4").Text
    Ticket = $WorkSheet.Range("C5").Text
    Role = $WorkSheet.Range("C8").Text
    RoleType = $WorkSheet.Range("C9").Text
    Environment = $WorkSheet.Range("C10").Text
    Manufacturer = $WorkSheet.Range("C12").Text
    SiteCode = $WorkSheet.Range("C15").Text
    isDMZ = $WorkSheet.Range("C16").Text
    OperatingSystem = $WorkSheet.Range("C18").Text
    ServicePack = $WorkSheet.Range("C19").Text
    OSKey = $WorkSheet.Range("C20").Text
    Owner = $WorkSheet.Range("C22").Text
    MaintenanceWindow = $WorkSheet.Range("C23").Text
    NbOfProcessor = $WorkSheet.Range("C26").Text
    NbOfCores = $WorkSheet.Range("C27").Text
    MemoryGB = $WorkSheet.Range("C29").Text
}
Download
GitHub
Technet Gallery
Other References
- Hey, Scripting Guy! How Can I Read from Excel Without Using Excel?
- Josh Miller - Excel part1
- Josh Miller - Excel part2
- Excel Automation Model
Thanks for reading! If you have any questions, leave a comment or send me an email at fxcat@lazywinadmin.com. I invite you to follow me on Twitter @lazywinadm / Google+ / LinkedIn. You can also follow the LazyWinAdmin Blog on Facebook Page and Google+ Page.
原文出處: LazyWinAdmin: PowerShell - Read an Excel file using COM Interface